If you are here, you are likely trying to work your way through the Inventr.io Python Starter Kit as I was. This post is unaffiliated with Inventr.io, and just documents my experience working through the first lesson. It should contain everything you need to know, but wasn't covered in the course.
My purchasing decision was based on the expectation was that this would be an everything-included kit designed to teach absolutely beginner electronics, using Python.
It is assumed you've addressed setting up the Raspberry Pi Pico W in Lesson 0, which can itself be a small challenge for newbies on macOS, especially when the cable you need isn't included.
From what I can tell after this one lesson, it appears to be more about using Python than understanding the electronics that came with the kit. I'm hoping another kit serves as the intro, as the Inventr website does not make it clear what prerequisite knowledge is needed.
This post assumes you have pretty much you don't know what you're looking at or why the instructor is making the decisions they are.
What's Wrong With the Instructions
Surprisingly, how to set up the hardware is NOT DISCUSSED AT ALL in the lesson!
Worse, the breadboard diagram on the website, is different than the one shown in the video tutorial 11:19 (and lasts for less than a second on screen), and again doesn't match the completed project in the video tutorial at 20:52 either.
There are other nits:
- The 'try' keyword is shown capitalized in the video at 07:19, which won't work.
- The code for the LEDs in the video at 15:24 specifies pins 0, 1, and 2, which is wrong for the example given, though code on the website, which is different from the video, is correct with pins 16, 17, and 18.
- The video shows the
timelibrary used, while the code on the website showsutime. (Both work.)
Additionally, because LEDs are diodes, they only work in one direction; this isn't covered. (Long leg is ground, btw.) And it isn't specified which resistor you should use, or why, or how to tell them apart.
Oh, and one of the resistor packs was mislabeled.
About the Circuit Breadboard
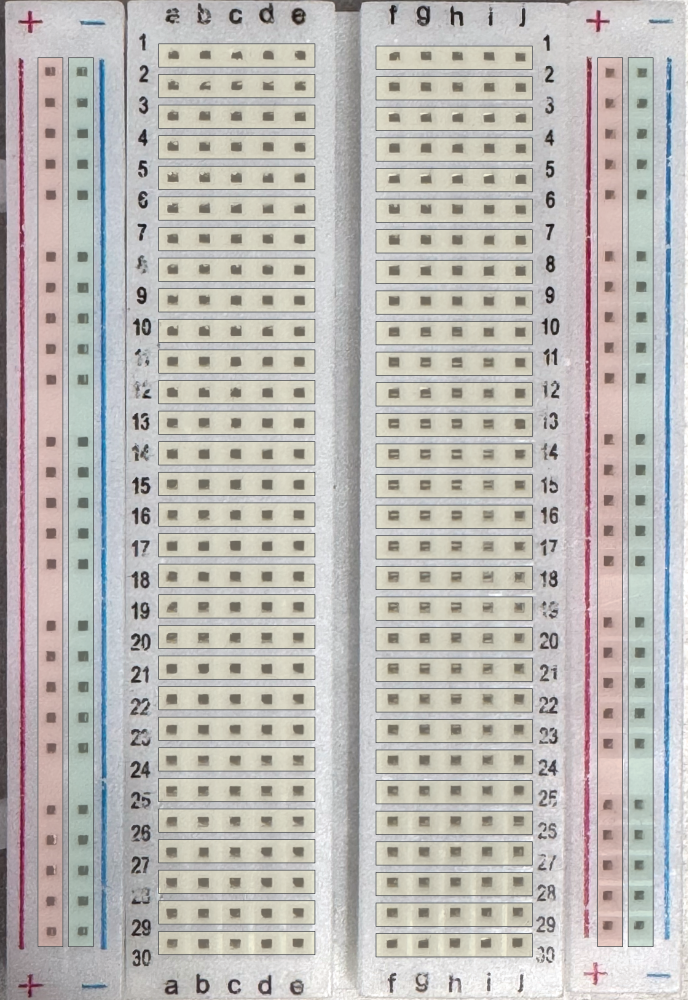
The circuit breadboard is structured so that it has two columns + and -, then ten columns labeled a to j, and another set of two columns + and -.
By convention, the red columns labeled + is where you connect the shared positive power, and the blue columns labeled - is where, by convention, you connect the shared ground (GND). The set on the left side is unrelated to the set on the right.
Each row, labeled 1 to 30 has a block of five pins connected, a to e, and then separately, f to j. If you want the whole row connected, you'll need to bridge the two sets.
Hardware Setup
It doesn't matter where the device is put, since all your wiring is relative to it. To access the pins, we need some space above and below the board. And, to give us some working room, we'll place it flush left for now.
Gently and evenly, with the MicroUSB facing the outside edge of the breadboard, place the Raspberry Pi Pico W onto the Breadboard at 30C–30H to C11–H11. Make sure no pins are bent, every one is aligned with, and smoothly going into, its corresponding hole.
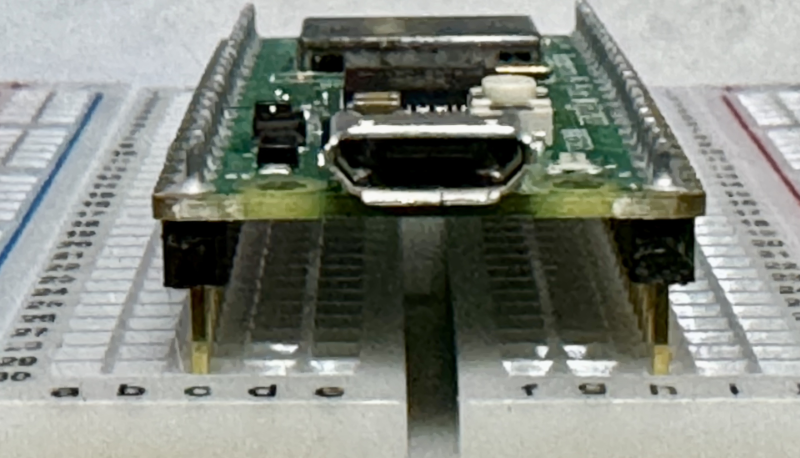
Then, gently depress it on each side — you may need to rock it — to get it to sit completely flush with the breadboard. It should go smoothly, do not force it.
You can then plug in the MicroUSB controller into the Raspberry Pi Pico W, and then into your computer, where presumably you are running the Thonny IDE, and have the MicroPython (Raspberry Pi Pico) - Board in FS mode selected in the IDE its bottom right.
Understanding the Pin Outs
The Raspberry Pi Pico W has forty pins. In the diagram below the start with 1 at the bottom left, increment to the right, then at pin 20 (far bottom right), the numbering continues counter-clockwise at the far top right, pin 21, and works right to left over to pin 40 at the top left.

The General Purpose I/O (GPIO, or GPnn for short) represent digital pins that either assert voltage or not.
Note that the GPIO numbers to not match the physical pin numbers; rather, you get a few GPIO, then a ground (GND), then a few more, and another GND, etc.
It is these GPIO numbers that you use with code like:
1
led_at_gpio16 = machine.Pin(16, machine.Pin.OUT) # GP16 is physical pin 21 on this device
More on this later. The GPIO numbers in red are the the ones you'll be concerned about when programming, and the row (a-e) or (f-j) will be where you want to be putting your wires to access them.
Power
If we look the diagram (see the purple labels on pins 36 and 37) the power pins are labeled as 3V3, which is shorthand for 3.3 Volts.
The GPIO pins will also be asserting this, when the pin is turned on.
1
some_led_set_by_machine_dot_Pin.value(True) # True = on, False = off
All of the ground pins (see the grey entries) are labeled 'GND'. Also, if you look very closely at the Raspberry Pi Pico W circuit board, you'll see that the GND pins are square, the other are round.
NOTE: Don't connect a positive voltage directly to ground, or you'll cause an electrical short circuit.
About the LEDs
If you look at an LED, it has one wire shorter than the other. That short wire must be the one going to ground (GND). If the LED is turned around the other way, because it's a diode, it won't work.
Fun fact: Red and Orange LEDs take about 0.005 Amps; the other colors take about 0.010 Amps.
The power supply minus the LED forward drop voltages is equal to Amperage time Resistance, or I*R as you learned in school.
This means that solving V=IR for R, yielding the equation V/I=R, gives us our resistor value in Ohms.
Voltage / Amperage = Minimum Resistance Needed in Ohms
We know all the values...
3.3 Volts / 0.005 Amps = 660 Ohms (Ω) for Red and Orange LEDS.
3.3 Volts / 0.010 Amps = 330 Ohms (Ω) for other colors.
This means any resistor greater than 660 Ohms protects our Red LED, and any greater than 330 Ohms protects the other colors.
By rough hand waving, anything over 1000 Ohms is safe.
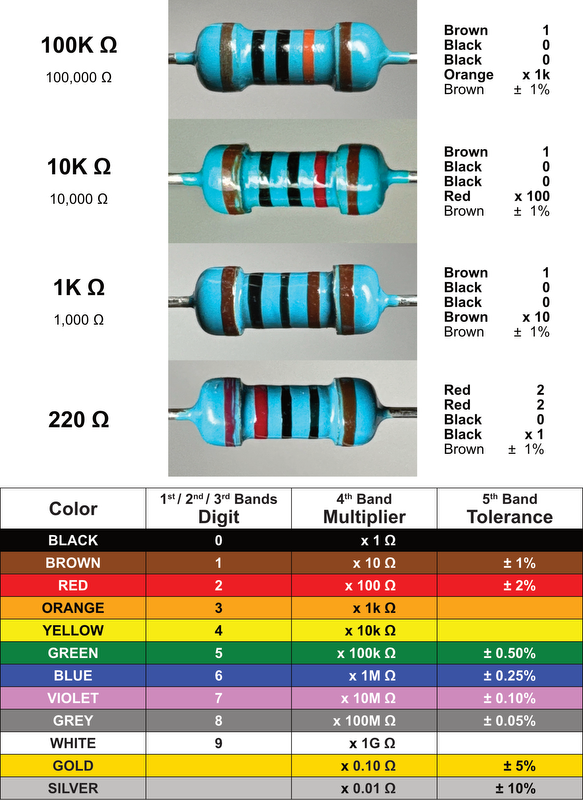
Resistors
Carefully look at the packaging, we've been given 1K, 10K, 100K, and 220K resistors. How do we tell them apart? Two ways.
One, by the color bands, assuming your eyes can see the color and detail. If I'm being honest, I had use a stand with alligator clips to hold them steady under a portable white lite desk lamp, and the iPhone Camera+: Pro Camera & Editor app in macro mode using steady shot.
The trick is telling which way to orient the resistor in order to read it right to left. And frankly, unless it's obvious, that brings us to method two.
Two, use a resistance meter. You can find simple ones for $10 or so, and there's some really nice ones by Klein Tools and you can go all out with Fluke.
Just measure it and be sure. I used a Klein Tools MM420.
Important Note
One of the resistor packages was mislabeled "220K" (that's 220,000 Ω) when it should have been 220 Ω. (Yours might be fine.)
Given that 220 Ω is less than the calculated 660Ω, 330Ω, and 1000 Ω numbers, it looks like we shouldn't use that set with the LEDs, just to be safe.
It's always a good idea to double check the resistors value with a multimeter rather than trusting hand notes on them.
About the Wires
You'll get a set of wires that look like a ribbon cable in a careful color arrangement. Trying to use them like that just doesn't work.
Turns out you can, and should, separate the wires like you would extract individual Twizzlers.
A Solution
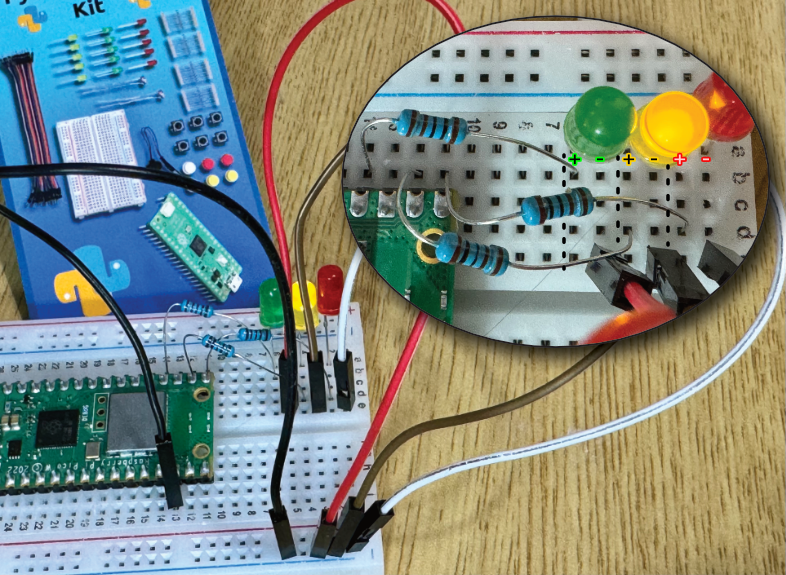
I put the LEDs in column A, with the short legs consistently on odd rows, so I could easily know which leg needs to go to ground.
- Red LED in 1A-2A (1A got the short leg, for ground)
- Yellow LED in 3A-4A (3A got the short leg, for ground)
- Green LED in 5A-6A (5A got the short leg, for ground)
Then, simply because they close to that side of the board, I used GP16 (to Red's 2A), GP17 (to Yellow's 4A), and GP18 (to Green's 6A), which supply power when those pins are turned on.
Since each LED needs a resistor, I used a 1K Ω resistor as a wire for each.
GP16 is C11, and row A11 to E11 are all connected, but some holes are covered up by the Raspberry Pi Pico W, leaving only A11 and B11 free (either will work, I used B11) and used a 1K Ω resistor to bridge to row 2 (that has the longer leg of the Red LED) picking 2D, just not to fatigue the resistor's wire.
GP17 is C12, using a 1K Ω resistor in similar manner to go from B12 to D4 (Yellow's long leg). In what feels like a game of Twister, but with wires, I made sure no exposed wires touched &emdash; this is important.
Note that the next physical pin is GND (in C13). GPIO pins do not have to be next to each other or even sequential.
GP18 is C14, using a 1K Ω resistor in similar manner to go from B14 to B6 (Green's long leg) — things were getting cramped, so I went with a free spot in the row so that no wires touched.
Now each LED needs a ground (GND). We can use the one at physical pin 18 (H13), so any of F13 to J13 will work. Since only I13 and J13 are physically available, we'll connect that to the ground plane using a wire (any color, but I went with black) from our rainbow pack of wires, and connect it to a blue (-) backplane. I stuck the other end of the wire in the fifth hole down in the blue (-) column two to the right of J, but anywhere is fine.
Finally, we connect from that ground plane column to the short legs of each the LEDs, which by convention we put in odd rows. Tear off three more wires. I put mine in 1E to the first hole in the blue (-) column that is two to the right of J. Then the next wire in 3E and in the second hole down. Then the next wire in 5E and the third hole down.
It's a lot of hops, and you're free to figure out a more optimal path using less distance or fewer wires.
Getting the GPIO Right in the Code
Know how we used GP16, GP17, and GP18? That means we need to use 16, 17, and 18 in the code.
1
2
3
4
# Initialize GPIO pins for LEDs
red_led = machine.Pin(16, machine.Pin.OUT)
yellow_led = machine.Pin(17, machine.Pin.OUT)
green_led = machine.Pin(18, machine.Pin.OUT)
You can use any GPIO you wish, as long as you connect it to the long leg of the desired LED, and then change the Python code to reflect which GPIO number you used.
Moving Serial Ports
To assemble the project, I disconnected my Raspberry Pi Pico W from the computer &emdash; partly so I could see what I was doing, second I didn't want to work with it powered up and risk the chance of plugging something into the wrong hole (which I did several times) and cause a short circuit harming something.
Only after I was sure, did I plug the device back into the computer.
When I got back to the Thonny IDE, it had all kinds of red error messages in its shell window. The play button was greyed out. It complained the serial port didn't exist.
So, I went down to the bottom right and went to select MicroPython (Raspberry Pi Pico) - Board in FS mode again. Turns out, the id number associated with the virtual serial port changed.
The moment I re-selected the "new" serial port, the run button re-appeared, and I was able to run the project.
Modified Code
I wanted my "Traffic Light" to blink much faster, and I wanted some indication the Pi was still working (so I wanted its built-in LED to blink to).
1
2
3
4
5
6
7
8
9
10
11
12
13
14
15
16
17
18
19
20
21
22
23
24
25
26
27
28
29
30
31
32
33
34
35
36import machine
import utime
# Initialize GPIO pins for LEDs
red_led = machine.Pin(16, machine.Pin.OUT)
yellow_led = machine.Pin(17, machine.Pin.OUT)
green_led = machine.Pin(18, machine.Pin.OUT)
led = machine.Pin('LED', machine.Pin.OUT)
# Function to turn all LEDs off
def all_off():
red_led.value(0)
yellow_led.value(0)
green_led.value(0)
# Main Loop
while True:
all_off() # Turn all LEDs off
led.value(True)
utime.sleep(0.5)
led.value(False)
red_led.value(1) # Turn red LED on
utime.sleep(.5) # Wait for 5 seconds
all_off() # Turn all LEDs off
yellow_led.value(1) # Turn yellow LED on
utime.sleep(.5) # Wait for 1 second
all_off() # Turn all LEDs off
green_led.value(1) # Turn green LED on
utime.sleep(.5) # Wait for 4 seconds
Wrapping Up
Do I think you should get the Inventr.io Python Starter Kit? Absolutely.
You'll need to grab a MicroUSB cable that does data (not charging-only). You might want a cheap multimeter as well for checking the resistors.
You'll need to understand how the breadboard is wired, the LED polarity orientation, the resistor values, that you're supposed to peel of wires as you need them, and locate the GPIO ports on your Raspberry Pi Pico W, and use those values with your code.
The office training material appears to give you an idea of what to do, but it is not a step-by-step follow along. Know that going in, you'll do fine.
If this helped you, consider sending a small donation my way. If you noticed any errors or omissions, please reach out.